What are Linear DNG files and how should you use them in your photo-editing workflow?
Photo editing software such as Lightroom and Capture One might give you creative freedom and flexibility, but that doesn’t necessarily mean that you’re getting the best possible image quality from your RAW files. Linear DNG files are part of a solution that allows you to combine different software to get ultimate image quality without having to overhaul your entire workflow.
Linear DNG files are RAW files that have been partially developed, having undergone some complex mathematical processing to lock in demosaicing. Depending on its intended purpose, a Linear DNG might also complete other parts of the RAW conversion process such as denoising and lens corrections. You can then take this optimized file into your photo-editing software of choice to complete the creative process — everything from white balance and exposure through to tone curves and color grading — with the knowledge that your final image will be the highest possible quality. As you edit your files, you might even find that you have greater flexibility than with the original RAW file.
By taking a RAW file and converting it to a Linear DNG file with one application and then editing it in another, you get to combine the strengths — one mathematical, one creative — of two different pieces of software.
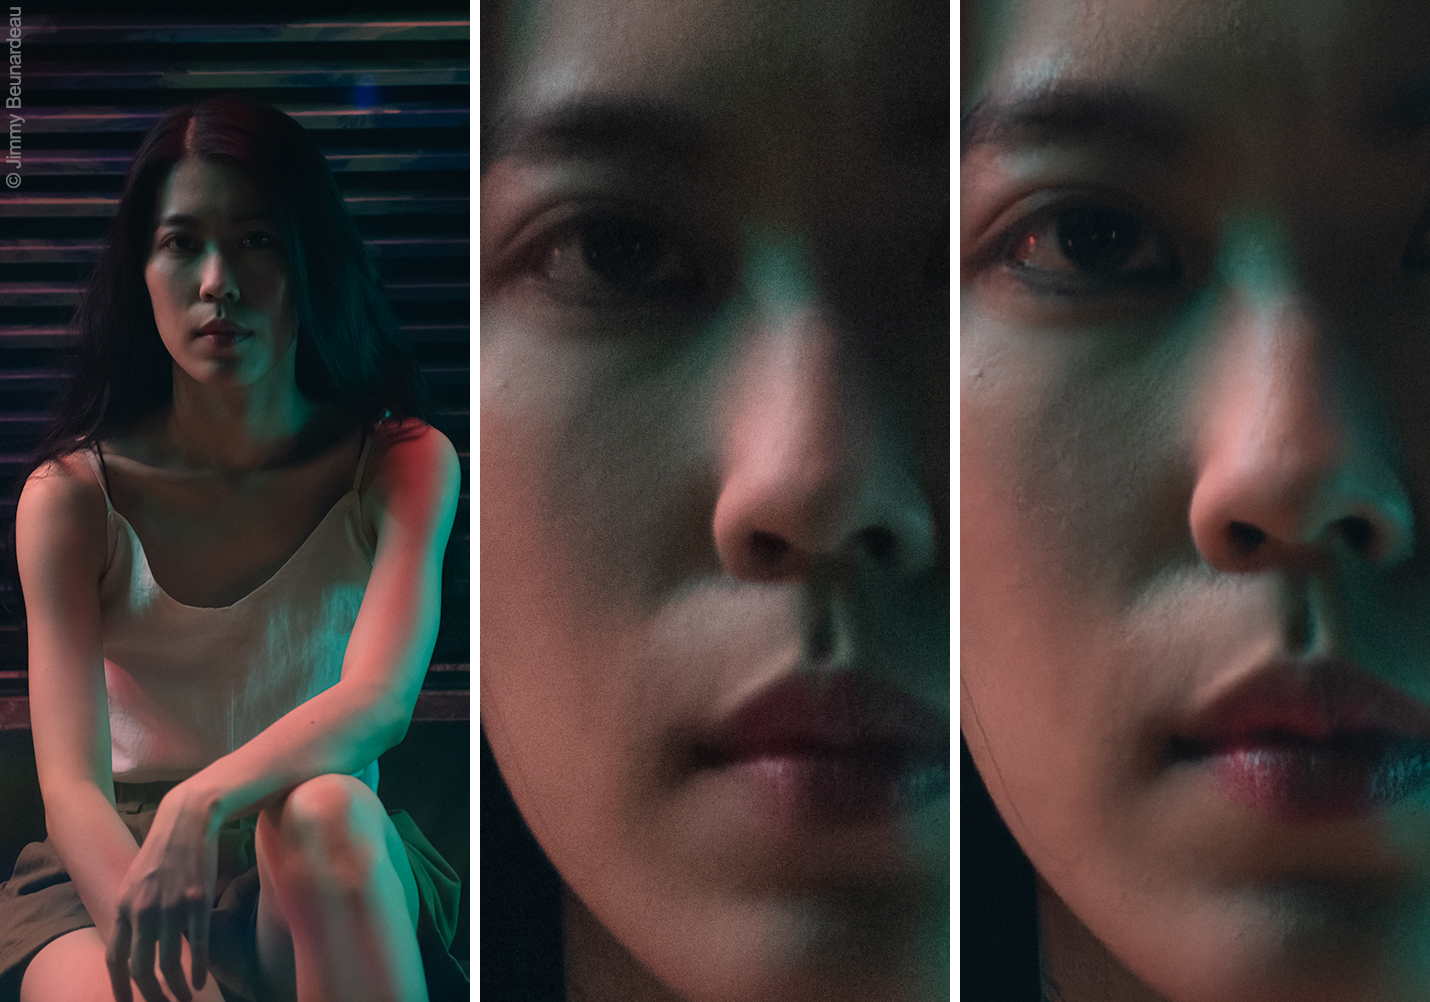
This image was edited as a RAW file using Adobe Lightroom. In the centre, you can see the results of Noise Reduction in Lightroom, and on the right is the optimization as a result of using DxO PureRAW 3.
The basics: RAW conversion, linearity, and DNG files
Every image sensor in every camera produces RAW files that need to be converted into a format that is capable of being displayed on-screen or printed on paper. It’s worth remembering that a camera does not “see” an image; instead, it captures information that must be transformed using sophisticated digital image processing. Software — either in the camera or on your computer — takes data that has been measured by each pixel and converts it into a color image. Unprocessed information is called “RAW data” and the process of transforming it into something visible is called “RAW conversion.” If you shoot in RAW, you’re saving the unprocessed data from the sensor and saving it to your memory card, ready to be processed by software such as DxO PhotoLab or Adobe Lightroom.
In some ways, a RAW image can be compared to a frame of negative film in analog photography. It contains all of the information that was captured when taking the photograph but more processing is needed before an image can be revealed.
Why should you shoot RAW?
Why would you capture data that still needs to be processed rather than JPEG files that are ready to be viewed? There are two reasons.
1. The first is image quality. As mentioned above, RAW conversion is complex. Doing it outside of the camera allows you to use more sophisticated algorithms, yielding better images.
2. The second reason is that it gives you control over certain aspects of the RAW conversion, such as exposure, color, and contrast.
Again, comparing it to analog photography is a useful illustration: JPEG files are a bit like Polaroid instant film. You get immediate results and that’s a huge advantage. However, the image quality cannot match that of negative film. Furthermore, with negatives, you can adjust exposure and color while developing your prints in the darkroom.
Of course, you can change the exposure and color of JPEGS, but RAW files contain a lot more information. There’s more dynamic range, a greater array of colors, and more levels of gray that allow you to preserve smooth tone transitions
RAW data is linear
RAW data is linear — but what does this mean? In mathematics, a linear system is one where multiplying an input by a certain amount means that the output will be multiplied by the same amount. Going back to your algebra at school, consider this example: In a linear system where 2x = 5y, then 4x = 10y, and 6x = 15y. Double one factor and you double the other, triple one factor and you triple the other, etc. Mathematicians would describe a linear system as one where scaling an input by a factor means that the output is always scaled the same factor: in other words, f(αx) = α f(x) for all α.
A photographic lens is a linear system. If you double the intensity of your studio lighting or double the exposure time while keeping the aperture unchanged, the amount of light reaching the image sensor in the camera will also double.
Just like the lens, the camera’s sensor is also linear. As a result, the data in the RAW file is a linear function of the amount of light in the scene. Notably, the first few steps of RAW conversion are linear. However, some non-linear steps soon take place — most notably, color rendering and gamma correction (i.e., the process of making data fit more closely to human eye’s understanding of how brightness works). To be able to retain quality, you want your exposure adjustments to be applied before these non-linear functions occur. This is where a JPEG file falls short as it doesn’t allow you to do that.
By contrast, when editing a RAW file, all of these changes are made before color rendering and gamma correction take place. Exposure, white balance, highlight recovery, boosting shadows — all of this can be achieved before irreversible steps are imposed and the editing process remains non-destructive.
An example can be seen in this photograph of a color checker card, captured with a white balance that had not been set correctly:
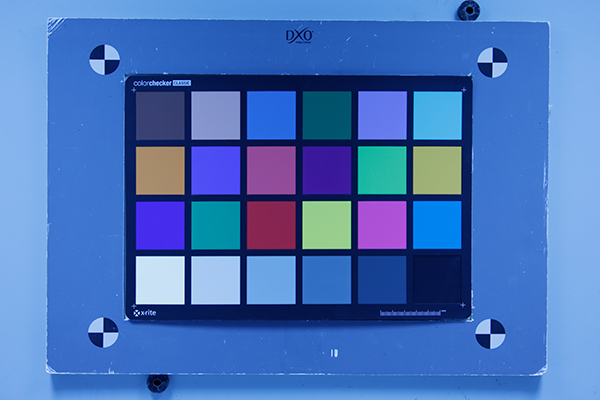
If you take the RAW file from the camera, you can use the eyedropper in your photo-editing software on a part of the image that is neutral gray to allow it to calculate the correct white balance:

The result is accurate (taking into account the limitations of the camera). Adjusting white balance on your camera before the shot or as part of the editing process achieves the same result because, just like the camera, the software applies this change in the linear domain. However, if you take the JPEG produced by the camera and attempt to correct the image in the same way, the results are noticeably different:

In reality, all of the grays in this scene are completely neutral. However, in this JPEG, each of the grays has a slight color cast. In addition, the individual color tiles are both quite far from their true hues and have lost some of their intensity. Recovering an accurate reproduction of the colors is impossible because the linearity of this information was given up when the RAW data from the sensor was converted into a JPEG.
What is DNG?
DNG stands for Digital Negative and is a RAW image file format designed by Adobe. Adobe’s goal was to create an open standard for storing RAW data as an alternative to the proprietary formats used by camera manufacturers — ARW from Sony, NEF from Nikon, CR3 from Canon, etc. All of these files can be converted to DNG simply by changing how the pixel values are stored. The values themselves remain unchanged.
The DNG format also provides a standardized means of storing metadata. Metadata — called XMP (Extensible Metadata Platform) — might include information such as shooting parameters, copyright, and star ratings, but they also contain settings for Adobe’s RAW conversion algorithms.
So what is Linear DNG?
Typically, DNG files store unprocessed RAW data. By contrast, Linear DNG files store some intermediate results of RAW conversion. Some initial processing steps have been applied — but only linear ones. This means that none of the data is lost to one-way, non-linear processes. As a result, Linear DNGs have exactly the same flexibility as RAW files when it comes to editing aspects such as brightness, color, and contrast.
Linear DNG files become useful when you want more flexibility in your workflow. If your preferred photo-editing software does a poor job of performing those initial processing steps, you might want to have another piece of software do it for you instead as a means of ensuring better image quality. With Linear DNG files, you can combine the strengths of different tools, squeezing more from your RAW files in terms of quality before switching to different software that gives your preferred mode of creativity.
Objective and subjective steps when processing RAW files
RAW conversion consists of many steps, both linear and non-linear. At DxO, we regard each step as either restoration or rendering. Here’s how they differ.
Restoration is where you are trying to achieve a perfect image from imperfect RAW data. There is an objective truth — the scene in front of your camera — that you are trying to recreate in a photograph as accurately as possible. Two fundamentals of this process are demosaicing — the conversion of values from individual pixels for red, green, and blue into accurate colors — and denoising — the removal of inaccurate pixels created as a result of interference and heat inside your camera, both of which become amplified when ISO is increased. Other important steps are the removal of vignetting, geometric distortions, and chromatic aberrations, and the correction of a lack of sharpness in the corners.
Restoration is considered an objective task in that there is a ground truth that you are trying to achieve as closely as possible. For example, with demosaicing, you want to create accurate colors as though they were seen with the human eye rather than the millions of individual values for red, green, and blue, as captured by the pixels on the camera’s sensor. In denoising, you want to restore the pixel values as though the image had been captured under better lighting conditions and using a lower ISO. With both of these tasks, computers are far better than humans.
Rendering, on the other hand, is fundamentally subjective. Even exposure and white balance are subjective. Trade-offs have to be made between highlights and shadows, and for many, the goal is not to faithfully reproduce the scene as it appeared in front of their camera. Instead, you might want to create a certain atmosphere or emotion. Even though computers might become better at guessing what sort of rendering humans might appreciate, many photographers prefer to have control over this part of the process.
90% of the sliders in your RAW conversion software — whether it’s DxO PhotoLab, Adobe Lightroom, or Capture One — are dedicated to rendering. Only 10% of the sliders relate to restoration, even though the software spends 90% of its computing time on restoration tasks. Furthermore, this is in spite of the fact that the restoration can determine how much flexibility a photographer has when choosing how to edit a photograph, and can have an effect on other aspects such as the potential to crop without compromising too much detail, or how large a print can be achieved.
Splitting your RAW conversion into rendering and restoration
A photographer’s choice of RAW processing software is highly subjective, and most are guided by the software they find the most intuitive in terms of rendering their images — even though the choice for restoration should be a completely objective decision. Unfortunately, the best tool for one is not necessarily the best tool for the other.
For restoration, those evaluating cameras and RAW conversion software — whether they are photo industry journalists or keen amateurs — have been running analyses using test scenes and evaluation targets for decades. These assessments have long confirmed that DxO’s optical corrections are the most accurate and that our DeepPRIME technology is better at removing noise while preserving more detail than any other RAW converter on the market. In terms of restoration, DxO DeepPRIME should be the obvious choice for any photographer seeking to maximize the quality of their images.
However, when it comes to rendering, we appreciate that the choice is more personal. Not only are there preferences for certain colors or levels of contrast, there is also habit. Your photographic style might be tied up in the tools that are most familiar to you, and we understand that. Changing your RAW converter would require learning a completely new system and potentially losing what makes your images unique in terms of look and feel. Switching away from Adobe Lightroom or Capture One and over to DxO PhotoLab might seem too much of a hurdle, just as switching between Canon and Nikon would also mean a big commitment.
With this in mind, we decided that photographers should be able to get the best of both worlds. What if you could take advantage of DxO’s renowned restoration algorithms while keeping your existing workflow? You could get superior image quality and files with greater flexibility — all without having to switch to new software. This is where Linear DNG files and DxO PureRAW come into play.
DxO PureRAW 5
Supercharge your cameras and lenses