A unique sensor now matched by next-generation processing: DxO DeepPRIME and DeepPRIME XD now support Fujifilm X-Trans
DxO’s latest software brings exciting news for Fujifilm photographers: both DxO PhotoLab 6 and DxO PureRAW 3 now process files from X-Trans sensors, producing remarkable levels of detail.
What is it about X-Trans cameras that make them different to other cameras on the market, and how is machine learning revolutionizing the way that raw files are processed? Head Scientist Wolf Hauser discusses the pros and cons of X-Trans and how DxO’s approach to processing them leads to significant advances in image quality.

Never a company afraid to try something different, Fujifilm introduced the X-Trans sensor in 2012. Given that the rest of the camera industry almost exclusively uses Bayer sensors, this was a bold move and the last ten years have seen many heated debates about whether X-Trans brings genuine benefits to photographers or is little more than an elaborate marketing trick. As will be explored below, there are certainly advantages and disadvantages to X-Trans and the algorithms used to interpret the raw data from this sensor are critical for getting good results. Fujifilm enthusiasts have long searched for the best software to process their images and DxO PhotoLab 6 and DxO PureRAW 3 now support for X-Trans raw files – in both DeepPRIME and DeepPRIME XD modes – offering clean images from Fujifilm cameras with fantastic detail rendition.
Before we can understand what makes X-Trans different from Bayer, it’s useful to remind ourselves how sensors capture light, how moiré comes about, and how the raw data from a sensor is turned into the images that we see on our screens.
How to Make a Camera Sensor See in Color
The pixels on a camera’s sensor, whether it’s the smartphone in your pocket or a medium format body, only capture the intensity of light. The solid-state photosites count photons, but they have no means of understanding the wavelength — and thus the color — of the light that they are receiving. To solve this problem, manufacturers creating the earliest digital cameras invented the Color Filter Array (CFA). This mosaic of red, green, and blue sits in front of the sensor and allows the camera to observe different colors through different pixels.
In order to create an image, the next step is to interpolate this data through a process called demosaicing. This uses sophisticated algorithms to calculate the missing red, green, and blue values for each individual pixel based on the surrounding pixels.
This design was inspired by nature: the human eye also has red, green, and blue receptors, although a critical difference is that these receptors are spread completely randomly across the retina. Our brains process this stream of continuously shifting data at incredible speed, expertly filling in any blanks using experience and assumptions — none of which is easily replicated in a camera. Instead, the typical camera sensor uses a uniform grid named after its inventor, Bryce Bayer, who came up with a beautifully simple design back in 1974.
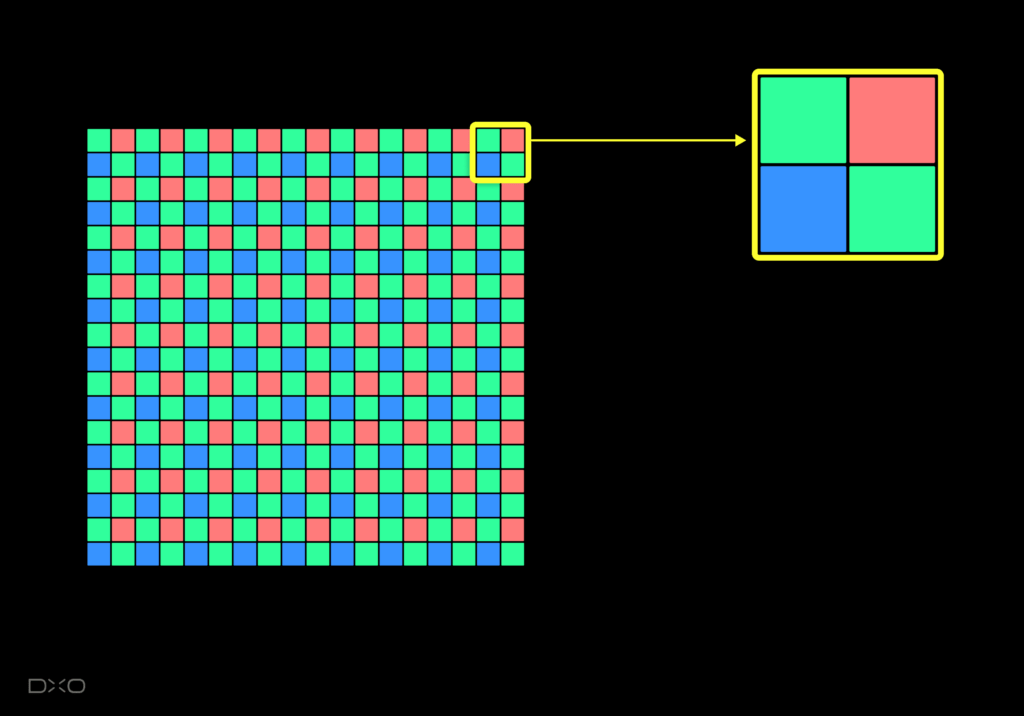
The foundation of the Bayer pattern is a block of four pixels with one red and one blue pixel sitting diagonally opposite one another, with the two remaining pixels both green. In effect, the sensor has been split into three: one-half of the pixels sees only green, one-quarter sees only red, and the remaining quarter sees only blue. As a result, the camera has to guess twice as many red values and twice as many blue values as it does green.
Moiré Explained
Capturing light through the means of a uniform grid of pixels can produce some strange visual effects. Moiré is an interference phenomenon that can occur when two grids interact, with patterns often appearing as waves or ripples. In the real world, we tend to see them most often when one dense, wire mesh fence sits behind another.
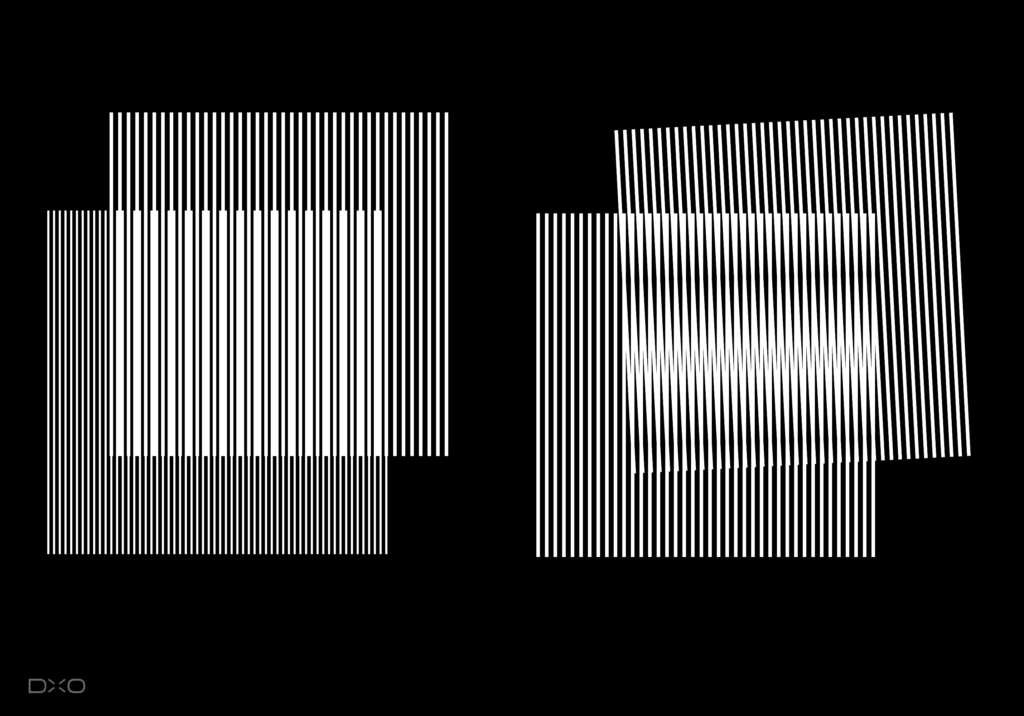
Cameras are particularly prone to creating these patterns for the simple reason that moiré is the result of two regular grids interacting, and one already exists in the form of the neatly arranged rows of pixels that make up the camera’s sensor. When the scene contains a regular pattern that is as finely detailed as the pixel grid, moiré may appear.
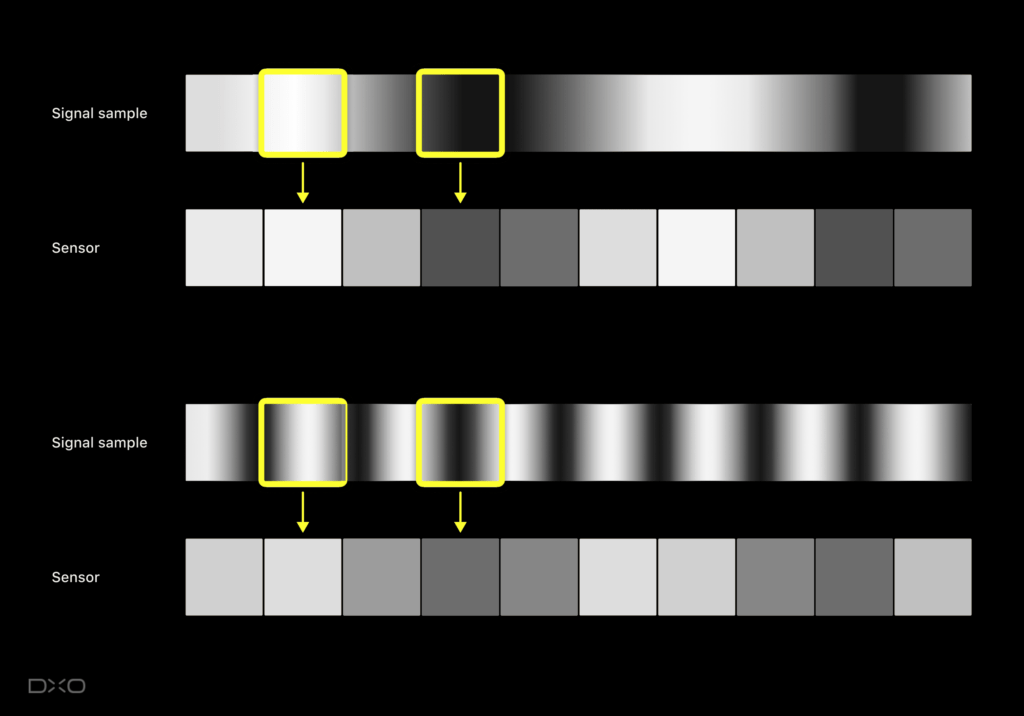
The diagram below simplifies the phenomenon by showing a single row of pixels. The sensor carves up the incoming texture, averaging its intensity within each pixel. Signal processing engineers call this process “sampling”: converting a continuous signal into (spatially) discrete values. In the first instance, the sensor can accurately understand the scene, despite the simplification that occurs. Difficulties arise if the details of the pattern become finer than the pixel grid. As can be seen in the second instance, the high frequency of the signal does not match with the lower frequency of the pixels, and the pattern breaks down. Instead of the original high frequency, we observe a lower frequency that never was part of the scene, albeit with strongly reduced amplitude.
Things get even worse if there are gaps between pixels. Suppose that we take out all pixels at odd positions and observe the signal only through pixels at even positions. As before, the incoming signal intensity is averaged over even pixels — but whatever hits the odd pixels is lost completely.
On the two previously shown textures, this will have no decisive impact. However, there is a range of frequencies that could be captured well without gaps but which transmute into moiré patterns when we introduce gaps. Again, we observe a lower frequency that was not in the scene, and this time its amplitude is almost unchanged compared to the original signal.
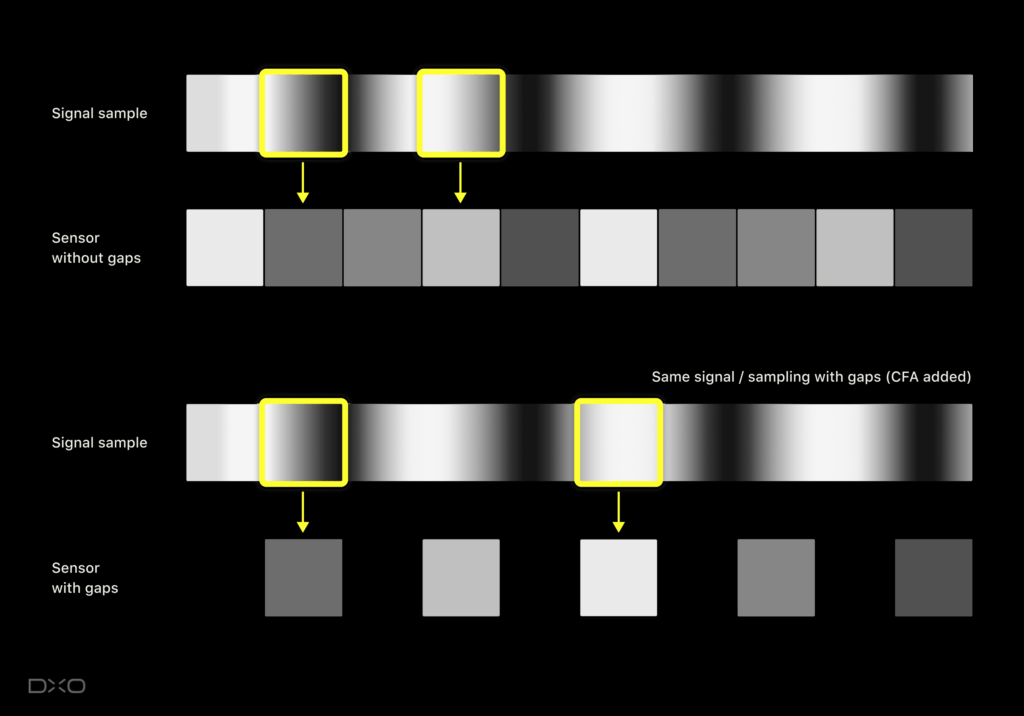
You might wonder “why would we introduce gaps?” This is exactly what a color filter array does. Our so-called RGB sensors are actually a red sensor with many gaps, a green sensor with fewer gaps, and a blue sensor, also with many gaps. Having more gaps means a greater chance of creating moiré patterns. More gaps in red and blue are the reason why you frequently observe color moiré, i.e. false hue patterns.
How to Avoid Moiré
As we have seen above, moiré arises when there is a mismatch between the resolving power of the lens and the resolution of the sensor, with the lens trying to force too much fine detail into too few megapixels. With sensor resolutions steadily increasing, and the pixel grid becoming finer, this is becoming less of a problem over time.
But most cameras don’t yet have high enough resolution to mitigate this issue, so manufacturers have had to find other means of dealing with moiré. One radical solution would be to remove the color filter array completely, creating a monochrome camera that is capable of capturing extra detail by virtue of the fact that the light reaching the sensor is no longer being filtered through three different colors. Obviously, for those of us who want color photographs, this is not ideal. Manufacturers typically use a slightly less brutal solution: blurring the image so that dense, fine patterns are eliminated before the light hits the sensor — effectively reducing the resolution of the image. This is achieved by placing an anti-aliasing (AA) filter (also called an optical low pass filter) in front of the Bayer filter, sacrificing a little detail in order to avoid moiré. Of course, placing an AA filter behind an ultra-sharp lens that cost a lot of money is not ideal, either. Some manufacturers now produce alternative versions of their high-end, high-resolution cameras that do not feature the AA filter for photographers who wish to capture as much detail as possible, even if that means risking moiré.
2012 saw Fujifilm make a bold design move. For several of its new cameras, it chose to get rid of this AA filter, claiming to have found an ingenious solution to the moiré problem: X-Trans.
As opposed to the two-by-two repeating pattern of the Bayer filter, the X-Trans filter is far more complex: a repeating pattern of six-by-six. This is still a long way from the random arrangement of the receptors in the human eye, but the increased periodicity means that the patterns which trigger moiré in Bayer filter cameras are less of a problem for X-Trans.
The more random-like pixel arrangement becomes more obvious when we look at, for instance, only the red pixels. If we hide the green and blue pixels, the gaps between the red pixels become more apparent. Bayer on the left, X-Trans on the right.
Note that with X-Trans, any given row or column is capable of “seeing” all three colors. By contrast, an individual row or column on a Bayer filter is always missing either a red or blue pixel:
Every row and every column on the X-Trans sensor (left) contains all three colors — even on the rows that have the fewest red and blue pixels. By contrast, on the Bayer sensor, every row and every column is always missing either red or blue pixels.
For regular patterns consisting of either only horizontal or only vertical high frequencies, this gives X-Trans a real advantage. In this instance, it actually avoids the gaps in the red and blue channels. We have seen above how these gaps can cause moiré, and X-Trans is definitely less prone to color moiré than Bayer as a result.
However, there is no such thing as a free lunch and the advantages of X-Trans bring with them certain disadvantages. Across its six-by-six base, only 8 pixels are red and only 8 are blue, while the same sized area of a Bayer sensor would have 9 of each. As a result, the X-Trans sensor is about 11% less sensitive to both red and blue. More of a factor, however, is that pixels of the same color can be further apart on the X-Trans filter compared to Bayer. On a Bayer filter, a red pixel is never more than one pixel’s width away from another red pixel. By contrast, on an X-Trans filter, it can be twice that.
On irregular textures and details as they typically occur in nature (foliage, flowers, faces, etc), the regular grid of the Bayer pattern does no harm, and X-Trans brings no benefits. By contrast, an X-Trans sensor’s lower density of red and blue pixels means that it will observe slightly less color detail. If a small color spot happens to fall in that fairly huge block of four green pixels, it is simply not observed at all.
Bayer Versus X-Trans, Pepsi Versus Coke?
As you may have noticed, discussing the finer details of camera technology can trigger some strong reactions, and debates over the advantages and disadvantages of X-Trans have played out on message boards and social media networks since it was launched. However, the color filter array is only one feature out of many that define a camera and few customers would have it foremost in mind when buying a camera. Fujifilm photographers appreciate the distinctive look and feel of their cameras, enjoying the ergonomics and ease of use, not to mention the results that can be achieved straight out of camera. Fujifilm’s engineers are experts when it comes to color following more than 70 years of experience in creating color photographs, and devotees love Fujifilm’s film simulations which draw on the company’s rich history of producing film stock. Names such as Astia and Velvia give their cameras a sense of authenticity.
The Bayer versus X-Trans argument has parallels with the ongoing battle between ARM processors and those designed by Intel. Apple’s marketing department will claim their iPad is better because it features their new ARM chip, while Microsoft wants you to believe that Surface is better because it uses the latest Intel chip. This allows aficionados of both brands to spend their nights in heated forum discussions about ARM vs Intel, RISC vs CISC — but 99% of all users don’t actually care. They chose their tablet because they prefer the look and feel of one over the other, the user experience, and ultimately, the branding.
Beyond some technical differences deep inside the system, for most users, the Fujifilm versus Canon/Nikon/Sony/etc decision might be not so different from choosing between Pepsi and Coke.
The Consequences of Complexity
Whatever the criteria for choosing a camera, squeezing the best possible performance out of its sensor is still important, and it’s useful to see what happens when you zoom into images at 100% and more.
It’s worth remembering that the final image is not solely the result of the sensor itself; whether it’s in-camera or through software, a variety of processes take place, notably demosaicing, the algorithm which fills in the gaps between the red, green, and blue channels. It’s a combination of these algorithms with the color filter array that determines the result.
One of the reasons that the Bayer filter has proven so tenacious is that engineers are used to processing its data. Finding the best recipe for demosaicing Bayer sensors has kept researchers busy for four decades, and the highly sophisticated algorithms developed over the years have allowed them to mitigate many of the limitations fundamental to its design. Even fairly simple algorithms, such as those embedded in the first digital cameras, yield fairly good results.
The increased complexity of the X-Trans pattern, on the other hand, entails a demosaicing process that is far more elaborate. Fujifilm’s engineers are said to have spent five years waiting for their cameras’ processing power to catch up before introducing X-Trans in the X-Pro1 in 2012. At the same time, the research community has published far fewer papers about X-Trans demosaicing than they have for Bayer; not only is it a more complex problem but less research effort has been spent solving it. It seems fair to assume that current X-Trans demosaicing algorithms are still some distance away from achieving a theoretically optimal solution. This is one reason that Fujifilm enthusiasts often find themselves jumping between software packages in search of a solution that delivers the best results.
Overcoming Complexity Through Machine Learning
At DxO, we have attempted to create better X-Trans processing in the past, but we were never quite satisfied with the outcome. The main challenge was that our processing traditionally took a different route to every other software: while most raw processors demosaic a RAW file before denoising, DxO always did it the other way around — one of the reasons that our software often produces cleaner results. As a consequence, adapting our RAW processes to cater for X-Trans sensors would not only have required a new demosaicing process, but also a new denoising process. Applying RAW denoising to X-Trans was again incredibly complicated compared to Bayer and rebuilding the process never yielded truly satisfactory results.
Today, image processing is being revolutionized by machine learning, particularly by a technology called convolutional neural networks. Within a few years, this new class of algorithms — no longer hand-crafted by researchers and engineers, but learned empirically by a computer from looking at millions of training examples — has made decades of research effort obsolete. With Bayer demosaicing, for instance, neural networks now easily beat the very best algorithms designed by humans.
While certainly frustrating for researchers who spent their life on demosaicing algorithms, this revolution is actually a huge opportunity. Not only are the results better, it also boosts productivity: computers find a state-of-the-art demosaicing algorithm in days or weeks rather than in years or decades. Machine learning is particularly well adapted to problems that have clearly defined inputs and expected outputs but where the mapping between them is too complex to be formulated as a classical algorithm. Image and speech recognition were the first examples but machine learning turns out to be such a powerful tool that it has proven useful in domains where decent classical algorithms already existed — such as demosaicing.
X-Trans demosaicing is a great candidate for machine learning. Being more complex than Bayer demosaicing, the advantage of machine learning over traditional engineering should be even greater than that achieved with Bayer demosaicing. Our counterparts at Adobe demonstrated exactly this when they introduced their machine learning-powered “Enhance Details” feature in early 2020. Reviewers concluded that, while the difference for Bayer images was rather subtle, it was a significant improvement for X-Trans images.
At DxO, we leveraged machine learning in DxO PhotoLab to solve another highly complex task: our RAW conversion technology — DxO DeepPRIME and DeepPRIME XD — uses a single, huge convolutional neural network to apply demosaicing and denoising at the same time. After 10 days of intensive work, our computer developed a highly sophisticated algorithm that outperforms our traditional demosaicing at low ISO, and both our traditional demosaicing and denoising at high ISO.
DxO PhotoLab 6 and DxO PureRAW 3 Feature DxO DeepPRIME and DeepPRIME XD for X-Trans
Of course, those 10 days of training our neural network were preceded by years of research. We had to define the “shape” of the network manually while the computer only determined its millions of parameters. But the most challenging part, on which we spent 80% of our effort, was ensuring that the problem was being described to the deep convolutional neural network as accurately as possible through the use of very precise training data.
Once work on Bayer sensor images was complete, it became clear that making changes to accommodate X-Trans raw files was no longer such a daunting task because the procedure for generating training data could be reused with very few modifications. There were still obstacles to overcome as we had to fundamentally change the network shape to accommodate for the complex X-Trans pattern, but it was conceivable and proved to be an exciting challenge. The results are exciting, too. Let’s have a look at two examples.
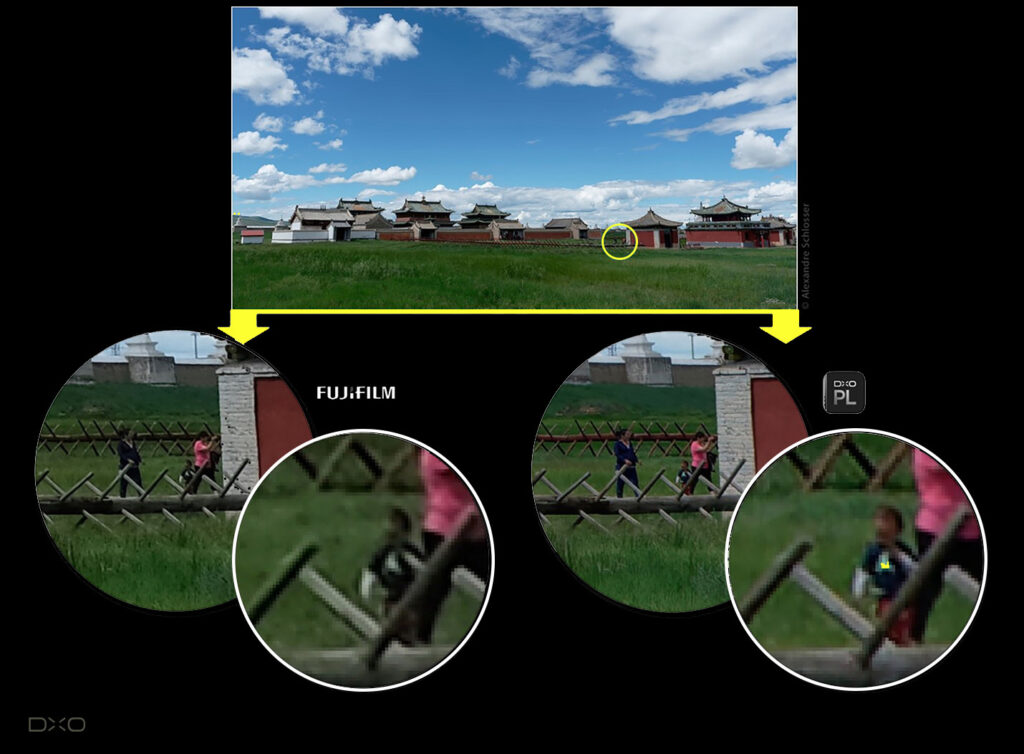
This landscape shot was taken with a Fujifilm X-T2 at ISO 200. The image looks reasonably good in terms of color and exposure, even without post-processing (top). However, when zooming in and examining the details — details that become important when making large prints — we notice that DxO DeepPRIME (using DxO PhotoLab 6, bottom right) does a much better job at preserving color details than the camera itself (bottom left). The camera fails to distinguish the varying hues of human skin, the wooden fences, and the grass; all end up being more or less uniformly greenish. By contrast, DxO DeepPRIME manages to distinguish these features, producing a more natural image. It also preserves the texture of the grass in the foreground more effectively. As a result, the image appears to be at a higher resolution and will reproduce better when printed in a large format.
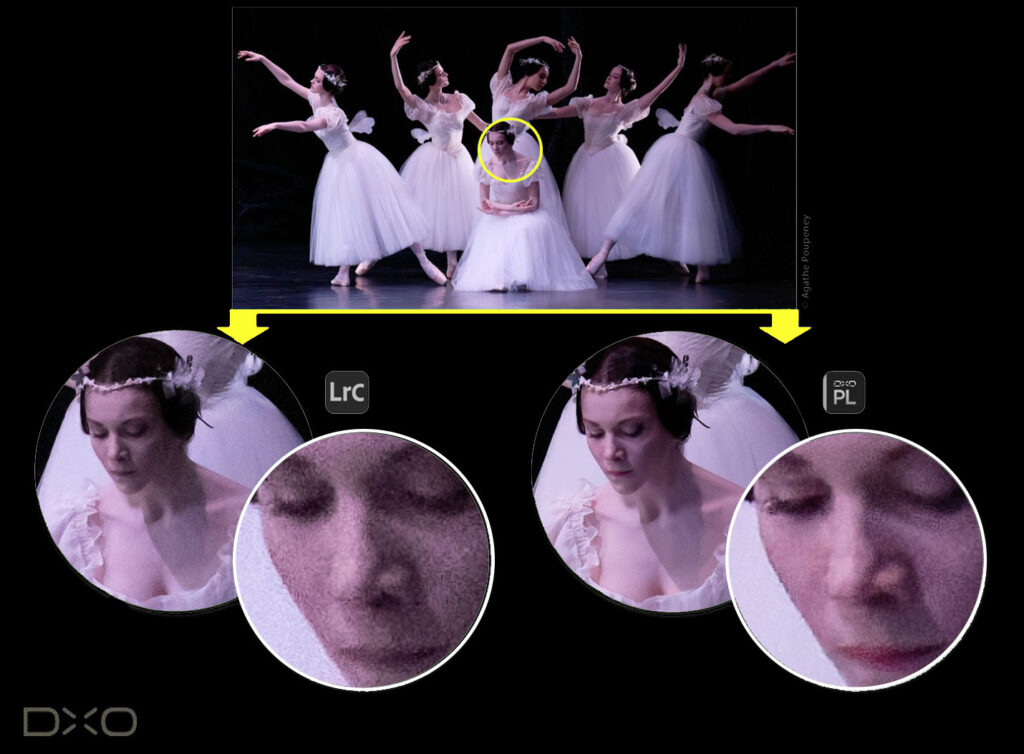
This low light indoor action shot was taken with a Fujifilm X-T3 at ISO 6400. The original photo was underexposed so we pushed it by two stops during post-processing — the equivalent of ISO 25600 (top). Such heavy exposure adjustment cannot be performed on JPEG images, so the comparison here is not with the camera but against a well known raw converter: Adobe Lightroom with Enhance Details (bottom left). When we look at the faces more closely, we can see that DxO DeepPRIME (using DxO PhotoLab, bottom right) yields a significantly cleaner result. Because it uses a neural network to run demosaicing and denoising at the same time, DeepPRIME does a better job at removing noise while at the same time preserving more detail in terms of both luminance and color.
More than just machine learning
Obviously, it takes more than DxO DeepPRIME on its own to fully support X-Trans in software as sophisticated as DxO PhotoLab and DxO PureRAW 3. Many internal tools used by our lab to calibrate the color and noise model of each camera body had to be adapted. Several other processing blocks had to be designed from scratch, such as the demosaicing algorithm used to display a preview while the user makes adjustments.
Ready for your photos
After an intense period of research and development, both DxO PhotoLab 6 and DxO PureRAW 3 are now ready to bring dramatic improvements to your RAW files. We believe that photographers will appreciate how our DxO DeepPRIME and DeepPRIME XD technology can draw out color detail that was previously missing, bring new life to old photographs, and transform high ISO images. Download a free trial and discover what DxO DeepPRIME can do for your photos.